Style Guide Post
Class aptent taciti sociosqu ad litora torquent per conubia nostra, per inceptos himenaeos.
This is a Sub Heading. It is an H2 Heading
Nam dignissim magna augue, id pulvinar libero. Suspendisse eget sem id nisi placerat cursus.
And here we can use a bulleted list:
- Pellentesque ultricies lectus nec risus porttitor malesuada.
- Ut eget velit eget felis pharetra egestas.
- Nullam pellentesque mauris vitae neque congue consequat.
Suspendisse euismod, dolor non blandit ornare, felis augue auctor lectus, nec mattis nisi nunc tempus ipsum.
“A pull quote can be used simply by clicking the quote button within WordPress. Per inceptos himenaeos. Vivamus faucibus sagittis magna lobortis accumsan.” —Mary Lyons
This is a H3 heading
Integer vitae odio orci, vel facilisis ligula. Aliquam tincidunt turpis nec dui scelerisque in venenatis libero venenatis. Duis eget nulla sem, malesuada luctus ipsum. Integer ut arcu risus, eget mattis libero.
Using the ‘You May Also Like’ Feature
For each post, it’s possible to display up to 3 ‘Related Posts’ underneath. Posts can be manually selected or automatically selected. Manual selection provides the greatest amount of control over what appears in the ‘You May Also Like’ section.
Manually Selecting Related Posts
-
- Decide which posts should appear in the related posts section.
- In the post edit page, search for the first post you want to relate.
![]()
-
- The search results are displayed in the left column. Click the plus (+) symbol to relate a post.
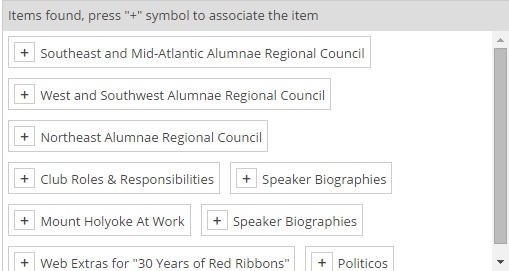
- Repeat for up to 3 posts. Posts that contain a featured image are preferred since they look better in the related post section. See section at the bottom of this page.
Automatically Selecting Related Posts
This works via tags. The plugin will automatically pull in posts that have the same tag.
-
-
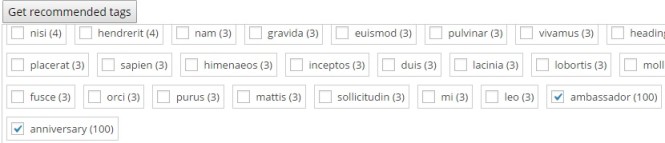
- Once you have written the post content, click the ‘Get Recommended Tags’ button.
- The plugin will display a list of suggested tags based on the words in the post text.
- Tick the words that you want to use. Each word you tick will be added as a tag on the post.
-
-
-
- Other posts that also contain the tag will be pulled into the ‘You May Also Like’section. Please note that the automatic selection of posts has higher priority than manual selection.
-
Using the Current Issue Feature
Each issue of the quarterly is a post categorised as “quarterly”. There is some custom code that pulls in the various articles that have a been associated with the issue.
Instructions for Creating a New Issue
Create the Quarterly Post
-
-
-
- Go to Posts > Categories (/wp-admin/edit-tags.php?taxonomy=categoryCreate). Create a new Category for this issue, e.g. “Summer 2015”. The parent should be Quarterly Issue
- Create a new post, the title will be e.g. “Summer Quarterly 2015”.
- Assign the category “Quarterly”.
- Assign the category you created in step 1, e.g. “Summer 2015”
- Add the magazine cover as the featured image.
- Add the ISSUU link to the custom field.
- Save the post as a draft, do NOT publish yet.
- Preview the post. You’ll notice that there’s a skeleton structure for the issue:
-
-
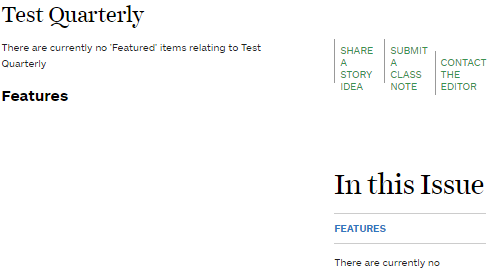
N.b. ignore any styling issues with this page, it is used solely as a preview for admin and is not displayed publicly. The styling will be fixed once the post is added to the Current Issue section.
Add Articles to the Issue
-
-
-
- Go through and categorise the posts according the the following rules:
-
-
President’s pen section: shows items that have been categorised as e.g. “Fall 2015” and “President’s Pen”
Departments section: shows items that have been categorised as e.g. “Fall 2015” and “Departments”
Features section: shows items that have been categorised as e.g. “Fall 2015” and “Features”
My Voice section: shows items that have been categorised as e.g. “Fall 2015” and TAGGED as “My Voice”
-
-
- Return to the main quarterly post we made at the beginning to review how the issue is taking shape.
- To make the issue live, publish the Quarterly Post (i.e. the post that’s titled e.g. Summer Quarterly 2015). The issue will now appear under the Current Issue section.
-
Using the Back Issues Feature
Home Page Boxes
Items that appear on the home page are posts that a) contain a featured image and b) are tagged as ‘home’. To add a box to the home page:
- Remove the ‘home’ tag from the post you want to remove.
- Tag the post you want to add as ‘home’ and ensure it has a featured image.
Home Page Banner
This is the large image on the homepage above the content boxes.
- Go to the dashboard and click on Front Banner on the left navigation
- Set the post that’s being used now to draft
- Click Add New
- Upload an image to the Featured Image section that’s 999 x 489 pixels
- Add words by creating a title
Travel Page Boxes
The travel page boxes are populated with posts that have the category ‘travel-packages’. To add a new item, simply add the ‘travel-package’ category. To remove an item, remove the ‘travel-package’ category.
Class and Club Products
The Class and Club Products page boxes are similar to the travel page. To add a new item, simply add the ‘class-and-club-products’ category to a post. To remove a post, remove the ‘class-and-club-products’ category.
Media and Images Page
Items that appear on the media and images page are posts that are tagged as ‘media’ and have a featured image.
Web Exclusive
- Create a separate post and categorize “Web Exclusive.” It should also have a link back to the feature. Make web exclusive has a featured image that is different from the main article image.
- In the feature post, insert the web exclusive coding in the first third of the article:
- Change the extra id to the post number of the web exclusive, found in the admin bar
April 20, 2015


Leave a Reply